Wednesday, 1 May 2013

Difference Between 3G and Wi-Fi Network

                              If you have a Smartphone, you have the option to connect internet via 3G or via Wi-Fi. But you know the difference between 3g and Wi-Fi. There are number of important differences between them like…

  • 3G connects through the cellular network of the provider while Wi-Fi connects to a local hotspot and uses the hotspot’s internet connection.
  • If you are using 3G, you should have associated data plan and you will also pay for it. Using Wi-Fi is not as complicated as you do not have to worry about such charges.
  • The main advantage of 3G network over Wi-Fi is coverage.3G network covers entire cities and you can travel one location to other location without losing internet connectivity. Wi-Fi hotspot's are not interconnected like 3G networks are. So if you travel too far from the access point, you lose the connection.
  • The downside of 3Gs range and coverage is the distance between the cell tower and your phone. While typical Wi-Fi distances are within a few meters, 3G may cover a couple of kilometers. Increased distance requires greater power to transmit and receive data. In simple terms, using 3G drains your battery a lot faster than when you are using Wi-Fi. It’s not a big deal if you are only using the connection for push email; but if you are going to browse the web or streaming videos, you are much better off using Wi-Fi comparison to  3G.
  • Another consideration is speed. Wi-Fi speed is greater than 3G speed.


Friday, 15 February 2013

Make Windows XP SP3 real and Install Microsoft Security Essential Free


Do you need to create your Windows XP real or looking real product key for Windows XP SP3? You wish to shop for a product key to create your software real.

But these days I’ll tell you ways to create your Windows XP SP3 real at freed from value. You wish to not obtain the serial keys as a result of I’ll share you the serial keys free. And follow the steps to create your Windows XP SP3 real.


Deactivate Windows:

• Click Start then click Run.

• Then kind regedit in open box then click OK.

• In the navigation pane, find then click on following registry keys.

HKEY_LOCAL_MACHINE\Software\Microsoft\WindowsNT\CurrentVersion\WPAEvents

• In the correct pane, right click OOBETimer, and then click Modify.

• Change one digit of this worth to deactivate.

Reactivate Windows and add new product key:

• Click Start and therefore the click Run then kind in open box following command then click OK.

%systemroot%\system32\oobe\msoobe.exe /a

• Click Yes, I would like to telephone a client service representative to activate Windows, and then click next.

• Click Change product key and sort the new product key within the New key boxes then click Update. If you came back to the previous window, click strike a Remind me later, then restart the pc.

• Repeat step one and a couple of to verify that Windows is activated.

Windows XP SP3 professional real product key:

• MR49R-DRJXX-M6PX2-V96BF-8CKBJ
• KWTDY-HYHVW-M9TGD-WYBPT-H7HGQ
• CB9YB-Q73J8-RKPMH-M2WFT-P4WQJ

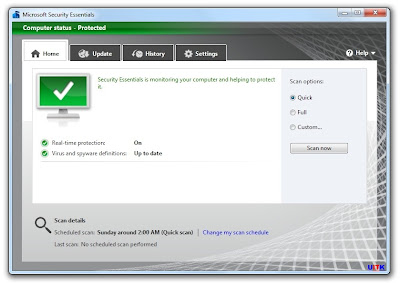
Microsoft Security Essential:

Download MSE and install it.

Microsoft Security Essential Offline Update:

For obtaining the newest update definitions for Microsoft Security necessities from Microsoft for free of charge, visit the subsequent links given below.


Download the acceptable Microsoft Security Essential update files thirty two bits.

Friday, 4 January 2013

Fill your form easily with RoboForm


              RoboForm is a password managing and also online form filling program that automates password entering and form filling, produced by Siber Systems, Inc. It is available for many internet browsers, such as Internet Explorer, Google Chrome, Firefox, as well as assistance for mobile phones. RoboForm is a software application that may assist you in accelerating your Internet experience by bookmarking web sites and entering earlier saved passwords.

Once you install RoboForm a toolbar will be put into Internet browser. If you are constantly concerned about forgetting the passwords for your favorite Web sites, this is very beneficial.

RoboForm makes logging into Web sites and also filling forms faster, simpler, and safer. RoboForm memorizes and safely stores each user name and password the first time you log into a website, after that automatically supplies them whenever you return. RoboForm's Logins feature removes the manual steps of logging into any specific online account. With just one single click RoboForm will navigate to a Web site, insert your username and password and click on the submit button for you. Completing lengthy registration or checkout forms is also very simple. Simply click on your RoboForm Identification and RoboForm fills-in the whole form for you.

You no more need to remember all your passwords. You remember only one Master Password, and RoboForm remembers the relaxation. This enables you to use more powerful passwords, making your online experience safer. RoboForm uses powerful AES encryption for total data security.

The free trial version is available only in 30 days.

Download Link : http://www.roboform.com/

Tuesday, 18 December 2012

Smart and Lightweight Computer Tool: GeekUninstaller


             Basic uninstall software programs are usually a waste of time, leaving quite a number of junk files and Registry keys to disorder your PC and slow your PC down. GeekUninstaller, scanning your laptop or computer for leftovers and ensuring it's cleaned up carefully. Maintain your PC clean! Use Force Removal for persistent and damaged programs.


It can remove programs regardless if the basic uninstall tool doesn't perform.  And most of all, No need to set up. Place single EXE file on your USB flash drive and put it to use anywhere.


This tool is incredibly fast and also has a simple but efficient user interface that just about anybody can use it to troubleshooting their system troubles.


Single EXE functions correctly on both 32 and 64-bit Windows XP/7/8//Vista.

Saturday, 8 December 2012

Apple iPad mini tablet available in India: prices start at Rs. 21,900


            A long awaiting Apple iPad mini tablet has launched in India and available at authorized Apple shops for a beginning cost of Rs 21,900. It is available now in different version like the 16 GB iPad mini Wi-Fi only version is offered for Rs 21,900, while the 32 GB and 64 GB versions cost to you Rs 27,900 and Rs 33,900, respectively. The iPad mini Wi-Fi + cellular version cost to you Rs 29,900 for the 16 GB version, and the 32 GB version is priced at Rs 35,900. The high-end 64 GB iPad mini Wi-Fi + cellular version sells for Rs 41,900.

The Apple iPad mini has an aluminum and glass design 7.2 mm thick, and weights only 308.443 Gram. The iPad mini has 35 percent more big display compared to 7-inch tablets, and up to 67 percent more usable viewing area while surfing the internet. The dual-core A5 chip provides for responsive graphics along with a multi-touch experience,  fast and smooth while still offering one-day battery life.

The Apple iPad mini offers a front-facing Face Time High-definition camera and a 5-megapixel iSight camera at the backside that allows for recording full 1080p High-definition video. The iSight camera includes video picture stabilization and both video cameras feature backside lighting.The iPad mini features dual-band 802.11n Wi-Fi support for speeds up to 150 Mbps, The iPad mini is available in a Wi-Fi version and a cellular one, which are world-ready with inbuilt support for most wi-fi standards, including LTE and DC-HSDPA. Using the Private Hotspot feature you can share a quick mobile data connection thru Wi-Fi, Bluetooth or USB with up to five other devices.


Specification :

Screen
  • Screen Size (Inches)                                  7.9
  • Screen Resolution (Pixels)                        1024*768
  • Screen Type                                               LED-backlit IPS LCD Capacitive Touchscreen
Memory
  • Internal Storage                                        16GB, 512MB RAM
Camera
  • Megapixel                                                  5MP
  • Fronfacing Camera                                  1.2MP
Sound
  • Speaker                                                    Yes
  • Audio Connector                                      3.5 mm
Connectivity
  • A2DP                                                       Yes
  • Wi-Fi                                                        Yes(802.11 a/b/g/n)
  • USB                                                         Yes
  • Bluetooth                                                  4.0
Software
  • OS                                                            IOS-6
Hardware
  • Processor                                                 Dual-core A5
  • Speed                                                       1Ghz
Battery
  • Battery                                                      Li-Ion
Weight
  • Weight                                                     308 Gram
Miscellaneous Features 
  • Siri
  • iCloud
  • Photos
  • Safari
  • App Store
  • iTunes
  • Game Center
  • iBooks
Warranty
  • Warranty                                                   1 Year


Thursday, 6 December 2012

Best Video Converter


         It is undoubted that our way of life is now spinning into an enormous media center, for the electronic products available on the market now a day like laptops, mobiles, media players, MP3 players etc. Videos can be taken for an immediate use, by using a cell phone and be shared via MMS or via uploading online. It is not required of taking a transportable CD player as MP3 and MP4 are already available offering a lot more flexibility and spaces.  Any place you go, you will find gadgets which make life simple in terms of media center. However these gadgets demand various file formats for this to read and play the file correctly. In case you have a video or file on a particular format, you may need to convert it to the format you want, and with this you will require a video converter.

        Movavi Video converter is a video converter that permits you to convert audio and video files into the file format that are required. This also allows you to enhance video quality with its editing option feature that enables you to work on basic editing job and apply innovative results, along with splitting file size into smaller files for soft playing on devices similar to mobile phones. This also has an internet video sharing feature that enables you to create HTML pages with the embedded video with almost no effort on your behalf. Movavi Video converter has user friendly interface which allows easy navigation and usage even for beginners. It will be updated with the hi-tech developments that accelerate video processing with optimization for multi-core processors.

       Movavi Video Converter offers a month free trial period to provide you an overview of the feature and also help you evaluate how impressive this video conversion tool is and how simple it is to use.

Wednesday, 5 December 2012

Mobile Phone Viruses


      A mobile phone virus is software programs that target mobile phones and PDA. As wireless phone and PDA networks be a little more numerous and more challenging, it has been a little more hard to secure them against electronic attacks in the form of viruses or various other malicious software programs.The first recognized mobile phone virus Cabir appeared in 2004. An infected only a small number of Bluetooth-enabled mobile phones.

    A mobile phone virus is simply the identical thing as a computer virus, an unnecessary executable file that infects a gadget and then duplicates itself to other devices. But whereas a computer virus or worm widely spread via e-mail attachments and Internet downloads a mobile phone virus or worm widely spread via Internet downloads MMS attachments and Bluetooth exchanges. The most familiar type of mobile phone infection today happens when a mobile phone downloads an infected file from a Computer or the Internet.  Mobile to mobile viruses are increasing today.

   The Commwarrior virus appeared in January 2005 which is the first mobile phone virus to effectively spread via an entire company via Bluetooth. It replicates through both Bluetooth and MMS. As soon as you get and set up the virus, it immediately begins searching for other Bluetooth phones in the area to infect. Simultaneously, the virus delivers infected MMS messages to each phone number in your address record.

  The number of proprietary operating systems in the mobile phone entire world is truly one of problems to mass infection. Infected data files generally show up concealed as applications like games, security patches, pornography and free stuff. Launching the message is not enough to get infected. You need to choose to open the message attachment and also agree to set up the program that is another problem to mass infection.
Mobiles that can only make and receive calls are not in danger. Only Smartphone’s with a Bluetooth connection and data capabilities may get a mobile phone virus. These types of viruses spread basically in three ways:

  1.  World-wide-web download
  2.  Bluetooth wireless connection
  3.  Multimedia Messaging Service 

   In most of these transfer techniques, the consumer needs to agree at least one time to operate the infected file. The virus is usually concealed as a game, security patch or other desirable application. A virus might access or delete all the contact data in your phone. It may send an infected MMS message to each number in your phone book – and MMS messages usually can be expensive to send, so you are really paying to send a virus to all your friends, members of the family and company associates.

Below are some steps you will take to reduce your probabilities of set up a virus:

  • 1. Switch-off Bluetooth discover-able mode 
  • 2. Verify security updates to learn about filenames you should keep an eye out for

Tuesday, 4 December 2012

Windows Hosts File


Are you aware about the Windows Hosts file?

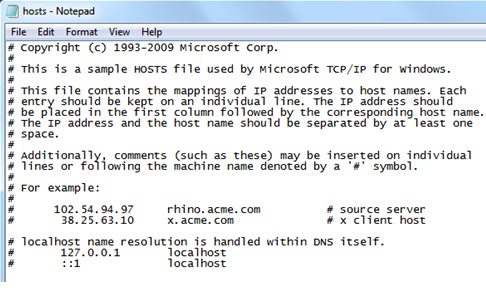
  If you are questioning what a host file is, a host file is a Windows plain-text file designed for mapping hostnames to IP addresses along with the host name allocated to your computer is known as local host. Every single website in the internet has an IP address linked to it. At the present, the hosts file works in mapping it to the real domain name. A clean hosts file has usually a single entry for local host. 127.0.0.1 Is the IP of the local host and every domain name in the hosts file which is correlated with this IP cannot access the Internet to keep trapped in your pc. For this reason, security programs can take it your advantage and utilize the hosts file to make your pc less dangerous. Even so, viruses can also edit the file and prevent you from using the internet. Whenever you see a line beginning with a pound sign (#) are called comments, and the primary function is to write descriptions.

    Quite a few people use this secret to block websites – for one example, you can point Facebook.com at 127.0.0.1 that is your PC’s local IP address. When anyone attempts to access Facebook.com on your PC, your PC will connect to itself at 127.0.0.1. It would not find a web server; therefore the connection will instantly fail.

Here are the certain areas of your Windows Hosts file:

  • Windows XP - C:\Windows\System32\Drivers\Etc
  • Windows Vista - C:\Windows\System32\Drivers\Etc
  • Windows 7 - C:\Windows\System32\Drivers\Etc
  • Windows 8 - C:\Windows\System32\Drivers\Etc
  • Windows 2008 Server - C:\Windows\System32\Drivers\Etc


  You are able to manually fix your Hosts File. Hosts files are simply a plain text file; you can easily amend using a Notepad or any specific text editor. To make changes simply open the Hosts File in your Notepad, make the suitable changes and re-save the file. Open your hosts file by Double-clicking on the Hosts file and selecting to open with Notepad. Delete or remove any lines without the (#) with the exception of the local host entry. Save the file.

  In case you are having troubles following the instruction above you can download a tool from Microsoft to automatically reset your hosts file.

Download the Microsoft Fix it and run to reset the hosts file.


Tuesday, 20 November 2012

How To Solve " Cannot open Drive With Double Click"

    Now a day’s one of my colleagues has came to me, he was bearing a dilemma computer cannot open drive with double click. Every time he does, a dialog box pop up with “Open with” message. This type of problem is normally caused by virus that infects Windows XP system. 

This virus normally creates a file named Autorun.inf in the root directory which blocks and restrict access to drives. Once  you open any specific drive, this file or folder initiate all the activities of the virus. The said Autorun.inf file is a read only file and normally hidden mode. This virus additionally  disables system file and folder option to guard itself. The solution to fix this is to erase the file and restart your system.


Follow these steps to delete Autorun.inf ----


  • Go to Start then Run and type cmd.
  • Type problematic drive d:, e: or whatever you want to solve and press enter.
  • Type cd\ then type attrib -r -h -s autorun.inf.
  • Type del autorun.inf.
  • Restart your PC.


Monday, 19 November 2012

Boost Your PC with SlimCleaner


               Your system become slowly, taking too much time to start an application and the last resort is to format the system. What to do now!!!


 If you are seriously thinking for a freeware program that not only gets in there and cleans out the deep dust, but offers a range of additional functionality, then SlimCleaner should really make your short list. It is very good tool to boost your system.


SlimCleaneris the most effective and 100 % portable software that lets you clean and optimize Windows systems. SlimCleaner combines the industry’s fastest PC cleaning engine.  It uses social networking and community-sourced feedback to tell people what’s on their computer, and the things they can do about it: it’s like having an army of tech-savvy geeks helping consumers maintain their machines. It have many tools to boost your system like Cleaner, Optimizer, Uninstaller, Software updater, Disk defrag, Duplicate file finder, Disk drive tools, Windows tools etc.


Designed for: Windows XP, Vista, Windows 7, Windows 8 operating system.

Important Notes : Disk Wiper warns the user of the whole lost of data when completely wiping a disk.


Download Link: http://slimcleaner.com
                               https://www.slimwareutilities.com/

Saturday, 17 November 2012

Reopen Closed Browser Tabs


  Did you mistakenly close a Internet browser tab you are still using and want to reopen it? Do you need to reopen a number of tabs you closed either intentional or unintentional?

This works on major browsers like Internet Explorer, Firefox and Chrome and is actually the simplest way to reopen tab. Press Ctrl + Shift + T and that’s it! Once more, pressing this combination more than once will reopen a number of closed tab.

Friday, 16 November 2012

How to Change The Default Location For Installing Applications


  Whenever you install a certain software or game it normally installs them to the default location of installed programs which is C:\Program Files. The majority of program installer gives you the choice to change the location the place you will place the software, but a number of applications don’t provide you the luxury to do that. You may want to change the program installer location if you have several partitions or hard drive and want to put all the installed programs on another disk while leaving the basic disk with only windows files installed.


Here is a quick guide on how you can change the default location for installing applications. This trick involves registry editing therefore I strongly suggest that you make a clone first on your registry before continuing with this guide.


1. Run your registry editor by going into Start –> Run –> type regedit.

2. Browse to the following keys

"My Computer\HKEY_LOCAL_MACHINE\SOFTWARE\Microsoft\Windows\CurrentVersion"


3. On right side pane look for the value 'ProgramFilesDir', change it to your location.


How to Shut off USB Devices Without Having To Use Safely Remove Hardware


        After you shut off a memory device from your PC meanwhile it’s transferring data files, there’s an enormous likelihood for you to suffer a loss of a handful  info or worst, your USB flash drive could get corrupted. Intelligent issue Windows encompasses a Safely take away Hardware possibility that permits you to disconnect your non-volatile storage safely. However, for many individuals, they notice it really time intense to travel through this way at any moment they take away their USB from their computer. Therefore if you’re craving for a fairly easy thanks to improve fast removal of USB devices and pass over Safely take away Hardware, this post is for you.

How to jump over Safely get rid off  Hardware possibility once unplugging USB devices:

1. Open Device Manager. You will notice it by looking “Device Manager” within the begin menu search field or within the panel.

2. Search for USB Devices/Disk Drives. Click on Disk Drives to expand and reveal your internal and external drives. The USB devices can permanently have “USB” closed in in their names.

3. Select fast Removal. Double-click the USB device that you would like to disable the Safely take away Hardware possibility. A replacement window can open, head to Policies tab. You’ll notice 2 removal policies: fast Removal and higher Performance. If you decide on higher Performance, you should ought to use the Safely take away Hardware possibility each time you shut off your USB whereas the short Removal policy allows you to disconnect the device safely while not victimization the aforementioned possibility.


Monday, 12 November 2012

Windows 8 : Troubleshooting

      Microsoft has launched Windows 8 brings you new ways to use your PC. Today i want to share some common troubleshooting tips which helps you in the journey of Windows 8.

If you are facing a problem related to Windows 8 application. You click a Windows 8 application and nothing else happens? Actually Windows 8 application does not support screen resolution lower than 1024*768 so increase your resolution first or if that's no help check or update your video drivers.

If you are facing problem related to slow performance, press Ctrl+Shift+Esc and click more details to check. Task Manager may be offered some clues to resolve problem. There you find Processes tab that show your using CPU time, RAM, Hard Drive and Network Bandwidth. The Performance tab gives you a complete graphical view of resource while App history shows you which application is the most resource-hungry in back over days. And if your boot time is slow, click the Startup tab to see boot-time launching programs. You can right click, disable those unused programs and will ensure they are not loaded next time.

Are you facing a driver or Hardware related problem? Launch Device Manager, select relevant device, right click on it, select Properties and click the new Event tab. If windows has installed drivers, related services or carried out other important actions on this device then you will now see them there, which is very helpful when troubleshooting.

Windows 8 have come with best Recovery options. If you are facing booting problem, press Shift+F8 during the launch process to access its recovery options. Go to the Troubleshoot menu, then advanced options, click the Automatic Repair Tool, which may fix your problems or if that's no help. Advanced menu enables you to use the last System restore point, Windows Startup Settings, and Command Prompt if you would like to troubleshoot your system manually. 'Refresh your PC' Troubleshoot menu's options may be preferable because it reinstalls Windows 8 but keeps your files safe. Finally we choose 'Reset your PC' option, which removes all your files and install a fresh copy of Windows 8.

For easy access to the Reset, Refresh and other disaster recovery features, open the new recovery applet in Control Panel because you do not have access these features from the boot menu.


Please express your opinions through comments.

Saturday, 10 November 2012

Remove Unwanted Objects from Images

          Webinpaint & Photo wipe both are image processing utility that removes unwanted objects on your photos quickly and easily without Adobe Photoshop. With the help of both tools you can remove unwanted object from your photos.
                                                                           Before
                                                                            After

Webinpaint is online utility  where you need to load image, use the marker to select problem area and click inpaint button to start restoration.

Photowipe is completely free utility where you just paint over them in black and click go.

Both are user friendly and handy tool.

Link Webinpaint : 

Download Link Photowipe :


Please express your opinions through comments.


Thursday, 8 November 2012

Upload Photos & Videos to Facebook from Desktop : Bloom

                Bloom is a desktop application that allows users to upload photos and videos easily to Facebook, download albums and view photos. You can upload and tag your photos new or an existing album also you can view your friends photos and download full albums with this application.


Download Link :


Please express your opinions through comments.

Sunday, 4 November 2012

Detect Keyloggers with Best Antilogger : Zemana Antilogger


                                Antiloggers  are the programs that detect the presence of Keyloggers on a  computer. Over the past few years, a lot of anti-logging programs have come in market to steal your valuable data, Zemana Antilogger as the best one to detect Keyloggers.


 Keylogger can easily be detected by a Antivirus program, but now hackers may use some typical methods such as Binding, Hexing or Crypting to make it harder for the Antivirus program to detect it. In this case, Zemana Antilogger comes handy as this program is specially designed to protect your PC against harmful Keyloggers. 

It detects Malware that is beyond the reach of traditional security.


How to Install all Windows Apps in a Single Click : Ninite

                      You have formatted your PC and want to install all software in a single click, do not bother. Use Ninite service, the easiest and fastest way to install all your software in a single click.

Ninite is a free service that lets users install all Windows applications automatically. It allows users to just pick your apps and click Get Installer to download a small executable file, Ninite does the rest.

Ninite can be used to install multiple software at once and no need to install each and every application one by one.

Link Ninite :


Please express your opinions through comments.

Google+